| Version 12 (modified by , 11 years ago) (diff) |
|---|
Using The Desktop Plugin In ExoGENI
The DETER lightweight federation system is a simple way to join your ExoGENI experiment with a DETER experiment. The ExoGENI experiment can dynamically join an experiment in DETER when the DETER experiment is created using the federation system. When the DETER experiment is terminated, the ExoGENI environment remains intact and can be reconnected to a similar experiment or to a different DETER experiment. The technology in general is also called DETER desktop federation.
The federation system accomplishes this by using a node that the experimenter adds to the ExoGENI topology that talks to DETER through its ExoGENI management interface. Traffic to or from DETER will currently pass through the management interfacs as well, though we expect to expand to using other ExoGENI facilities in the near future.
The federation node runs an image DETER provides and needs some simple configuration from the ExoGENI experimenter to coordinate with DETER. In the simplest case, that configuration consists of:
- The IP address on which DETER can reach the management interface
- The DETER(s) user who is allowed in create experiments that talk to this ExoGENI slice
The rest of this document describes how to get and use the lightweight federation technology in ExoGENI.
Getting The Lightweight Federation Image and Getting DETER Federation Rights
The lightweight federation image can currently be found at http://www.isi.edu/~faber/tmp/fedd.xml . Its SHA1 hash is 9ff5313464521f228cdfd7e2e2d2a6c5a0eb8ae0.
Adding these lines to your .flukes.properties file on your desktop will make the image accessible from flukes menus. (Change the number in image1 to be an unused number if you already have custom images defined.
image1.name=Fedd-enabled Ubuntu 12.04
image1.url=http://www.isi.edu/~faber/tmp/fedd.xml
image1.hash=9ff5313464521f228cdfd7e2e2d2a6c5a0eb8ae0
In addition, users will need to get ther DETER accounts authorized to create federated experiments. DETER administration controls this facility because it allows users to reach outside DETER, which we normally do not allow. To get an account authorized for federation, contact faber@….
Connecting a Single ExoGENI node to a DETER Experiment
This section is a tutorial description of setting up a federated experiment to an ExoGENI node.
Configuring ExoGENI
The simplest form of lightweight federation is to conect a single ExoGNEI node to a deter experiment. We do this by creating a single-node ExoGENI slide that runs teh federation software and connecting a DETER experiment to it when that experiment is created.
To create the single-node ExoGENI experiment, create one a single node slide using the federation image above. When the slice exists, log in to the node and configure the federation software. To do that the experimenter needs to know the two facts above.
The image provides a script to set up a single node for federation. The script and the federation configuration both are stored in the /usr/local/etc/fedd directory. To configure the federation system, log into the node, change directory to /usr/local/etc/fedd and run the init_fedd script there. It takes 2 parameters, the management IP address and the experimenter to authorize. The following sequence will configure fedd to allow user "faber" to contact DETER using IP address 192.1.242.14:
~# cd /usr/local/etc/fedd
/usr/local/etc/fedd# ./init_fedd 192.1.242.14 faber
When that script completes, start the federation system on the ExoGENI node. When debugging we recommend leaving a window open and running the daemon as:
# fedd.py --config /usr/local/etc/fedd/desktop.conf --debug
You can also run it in the background, logging to /var/log/fedd.log by:
# touch /var/log/fedd.log
# fedd.py --config /usr/local/etc/fedd/desktop.conf --logfile /var/log/fedd.log &
fedd.py expects the logfile to exist, hence the touch command.
There are some detailed debugging messages that libraries and other dependent software produce that are visible with --debug that are lost during normal logging.
Creating the experiment on DETER
To connect the ExoGENI node to a DETER experiment, specify an federated experiment with the node that is to be on ExoGENI as being on testbed "desktop". Here is an example DETER experiment description of that format:
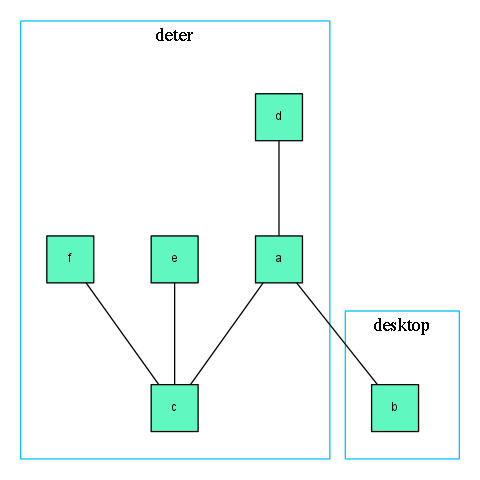
# simple DETER topology federated to a desktop
#

set ns [new Simulator]
source tb_compat.tcl

set a [$ns node]
set b [$ns node]
set c [$ns node]
set d [$ns node]
set e [$ns node]
set f [$ns node]
tb-set-node-testbed $a "deter"
tb-set-node-testbed $c "deter"
tb-set-node-testbed $d "deter"
tb-set-node-testbed $e "deter"
tb-set-node-testbed $f "deter"

tb-set-node-testbed $b "desktop"

set link0 [ $ns duplex-link $a $b 1Gb 0ms DropTail]
set link1 [ $ns duplex-link $a $c 1Gb 0ms DropTail]
set link2 [ $ns duplex-link $a $d 1Gb 0ms DropTail]
set link3 [ $ns duplex-link $e $c 1Gb 0ms DropTail]
set link4 [ $ns duplex-link $f $c 1Gb 0ms DropTail]

$ns rtproto Static
$ns run
You can download a copy of that file.
That file specified a topology that looks like this. Computers are boxes and network connections are lines. The larger blue outlines show which testbed each computer is in.

To instantiate that topology, run the command:
fedd_create.py --file desk.tcl --experiment_name $EXPNAME --map desktop:https://$MGMT_IP:23231
where $EXPNAME is replaced with a short mnemonic name for the combined experiment and $MGMT_IP is the external management IP of the node running the federation software.
When that returns, it will return something like:
localname: faber-smart5
fedid: 2b7b6852a2db53d3e77431937e1da01d8fbf335d
status: starting
DETER is coordinating between its local federation controllers and the one running on the ExoGENI node, allocating resources, and stitching them. You can check the status using the fedd_multistatus.py command:
users:~$ fedd_multistatus.py
faber-smart5:2b7b6852a2db53d3e77431937e1da01d8fbf335d:active
faber-smart1:9a57f78345e04136e8696a3439b476f3bc2f444d:failed
faber-smart2:7afc1dbbc29b6c7f46128d6dc0502136a95cb6cf:starting
That output shows three federated experiments. The experiments are:
- faber-smart5 which can be accessed and used for experimentation
- faber-smart1 which failed and cannot be accessed
- faber-smart2 which is in the process of being created. It will eventually transition to active or failed.
An experimenter can poll using fedd_multistatus.py or watch the debugging log using fedd_spewlog.py. The second looks like (where $EXPNAME is faber-smart5):
users:~$ fedd_spewlog.py --experiment_name $EXPNAME
03 Mar 14 16:46:50 fedd.experiment_control.faber-smart5 Calling StartSegment at https://192.1.242.14:23231
03 Mar 14 16:46:50 fedd.experiment_control.faber-smart5 Calling StartSegment at https://users.isi.deterlab.net:23231
Allocatation complete03 Mar 14 16:47:50 fedd.experiment_control.faber-smart5 Waiting for sub threads (it has been 1 mins)
03 Mar 14 16:48:50 fedd.experiment_control.faber-smart5 Waiting for sub threads (it has been 2 mins)
03 Mar 14 16:46:52 fedd.access.faber-smart5 State is none
03 Mar 14 16:46:52 fedd.access.faber-smart5 [make_null_experiment]: Creating experiment
03 Mar 14 16:47:14 fedd.access.faber-smart5 [make_null_experiment]: Create succeeded
03 Mar 14 16:47:14 fedd.access.faber-smart5 [start_segment]: creating script file
03 Mar 14 16:47:14 fedd.access.faber-smart5 [scp_file]: /usr/bin/scp -o IdentitiesOnly yes -o StrictHostKeyChecking no -o ForwardX11 no -i /usr/local/etc/fedd/deter/fedd_rsa /tmp/tmpFlZEWb faber@users.isi.deterlab.net:tmpFlZEWb
03 Mar 14 16:47:14 fedd.access.faber-smart5 [ssh_cmd]: /usr/bin/ssh -n -o 'IdentitiesOnly yes' -o 'StrictHostKeyChecking no' -o 'ForwardX11 no' -i /usr/local/etc/fedd/deter/fedd_rsa faber@users.isi.deterlab.net sh -x tmpFlZEWb
03 Mar 14 16:47:14 fedd.access.faber-smart5 [scp_file]: /usr/bin/scp -o IdentitiesOnly yes -o StrictHostKeyChecking no -o ForwardX11 no -i /usr/local/etc/fedd/deter/fedd_rsa /tmp/access-8Yev3U/fedgw_rsa.pub faber@users.isi.deterlab.net:/proj/DeterTest/exp/faber-smart5/tmp/fedgw_rsa.pub
03 Mar 14 16:47:15 fedd.access.faber-smart5 [scp_file]: /usr/bin/scp -o IdentitiesOnly yes -o StrictHostKeyChecking no -o ForwardX11 no -i /usr/local/etc/fedd/deter/fedd_rsa /tmp/access-8Yev3U/fedgw_rsa faber@users.isi.deterlab.net:/proj/DeterTest/exp/faber-smart5/tmp/fedgw_rsa
03 Mar 14 16:47:15 fedd.access.faber-smart5 [scp_file]: /usr/bin/scp -o IdentitiesOnly yes -o StrictHostKeyChecking no -o ForwardX11 no -i /usr/local/etc/fedd/deter/fedd_rsa /tmp/access-8Yev3U/hosts faber@users.isi.deterlab.net:/proj/DeterTest/exp/faber-smart5/tmp/hosts
03 Mar 14 16:47:15 fedd.access.faber-smart5 [scp_file]: /usr/bin/scp -o IdentitiesOnly yes -o StrictHostKeyChecking no -o ForwardX11 no -i /usr/local/etc/fedd/deter/fedd_rsa /tmp/access-8Yev3U/ca.pem faber@users.isi.deterlab.net:/proj/DeterTest/exp/faber-smart5/tmp/ca.pem
03 Mar 14 16:47:16 fedd.access.faber-smart5 [scp_file]: /usr/bin/scp -o IdentitiesOnly yes -o StrictHostKeyChecking no -o ForwardX11 no -i /usr/local/etc/fedd/deter/fedd_rsa /tmp/access-8Yev3U/node.pem faber@users.isi.deterlab.net:/proj/DeterTest/exp/faber-smart5/tmp/node.pem
03 Mar 14 16:47:16 fedd.access.faber-smart5 [scp_file]: /usr/bin/scp -o IdentitiesOnly yes -o StrictHostKeyChecking no -o ForwardX11 no -i /usr/local/etc/fedd/deter/fedd_rsa /tmp/access-8Yev3U/deterdesktoptunnel0.gw.conf faber@users.isi.deterlab.net:/proj/DeterTest/exp/faber-smart5/tmp/deterdesktoptunnel0.gw.conf
03 Mar 14 16:47:16 fedd.access.faber-smart5 [scp_file]: /usr/bin/scp -o IdentitiesOnly yes -o StrictHostKeyChecking no -o ForwardX11 no -i /usr/local/etc/fedd/deter/fedd_rsa /tmp/access-8Yev3U/client.conf faber@users.isi.deterlab.net:/proj/DeterTest/exp/faber-smart5/tmp/client.conf
03 Mar 14 16:47:17 fedd.access.faber-smart5 [scp_file]: /usr/bin/scp -o IdentitiesOnly yes -o StrictHostKeyChecking no -o ForwardX11 no -i /usr/local/etc/fedd/deter/fedd_rsa /tmp/access-8Yev3U/experiment.tcl faber@users.isi.deterlab.net:/proj/DeterTest/exp/faber-smart5/tmp/experiment.tcl
03 Mar 14 16:47:17 fedd.access.faber-smart5 [scp_file]: /usr/bin/scp -o IdentitiesOnly yes -o StrictHostKeyChecking no -o ForwardX11 no -i /usr/local/etc/fedd/deter/fedd_rsa /tmp/access-8Yev3U/software/fedkit.tgz faber@users.isi.deterlab.net:/proj/DeterTest/software//faber-smart5/fedkit.tgz
03 Mar 14 16:47:18 fedd.access.faber-smart5 [scp_file]: /usr/bin/scp -o IdentitiesOnly yes -o StrictHostKeyChecking no -o ForwardX11 no -i /usr/local/etc/fedd/deter/fedd_rsa /tmp/access-8Yev3U/software/seer-fbsd71-current.tgz faber@users.isi.deterlab.net:/proj/DeterTest/software//faber-smart5/seer-fbsd71-current.tgz
03 Mar 14 16:47:18 fedd.access.faber-smart5 [modify_exp]: Modifying faber-smart5
03 Mar 14 16:47:35 fedd.access.faber-smart5 [modify_exp]: Modify succeeded
03 Mar 14 16:47:35 fedd.access.faber-smart5 [swap_exp]: Swapping faber-smart5 in
03 Mar 14 16:49:46 fedd.access.faber-smart5 [swap_exp]: Swap succeeded
03 Mar 14 16:49:46 fedd.access.faber-smart5 [get_mapping] Generating mapping
03 Mar 14 16:49:47 fedd.access.faber-smart5 Node mapping complete
03 Mar 14 16:49:47 fedd.access.faber-smart5 Link mapping complete03 Mar 14 16:49:48 fedd.experiment_control.faber-smart5 [start_segment]: Experiment faber-smart5 active
active
The --experiment_name parameter is the same as on the fedd_create.py command, or selected from fedd_multistatus.py output.
The fedd_spewlog.py command prints changes to the log as they appear and terminates when the experiment transitions to either active or failed state.
Interacting with the Experiment
Once an experiment is active, it completes stitching itself together and a user can log in to the various nodes using the native testbed mechanisms. That stitching may take a minute or two after the federation system declares the experiment active. Additionally it may take the dynamic routing some time to converge, depending on the complexity of the topology.
Inside the DETER experiment, one can log into the nodes and interact with them by node name as usual. Details are here. With node b on ExoGENI and a on DETER, as shown above, this sequence shows the transparent connection. A user logs into node a in the local experiment (experiment faber-smart5 in in project detertest) and pings node b from node a.
users.isi.deterlab.net:~$ ssh a.faber-test.detertest
a:~$ ping b
PING b-link0 (10.0.3.2) 56(84) bytes of data.
64 bytes from b-link0 (10.0.3.2): icmp_req=1 ttl=64 time=152 ms
64 bytes from b-link0 (10.0.3.2): icmp_req=2 ttl=64 time=76.3 ms
While for all intents and purposes, b (in ExoGENI) is part of the experiment, the long ping times make it easy to identify:
a:~$ ping e
PING e-link3 (10.0.1.1) 56(84) bytes of data.
64 bytes from e-link3 (10.0.1.1): icmp_req=1 ttl=63 time=0.797 ms
64 bytes from e-link3 (10.0.1.1): icmp_req=2 ttl=63 time=0.437 ms
Similarly, one can log into the ExoGENI node and see the DETER nodes by the same names:
root@server-18393:~# ping a
PING a-link2 (10.0.0.2) 56(84) bytes of data.
64 bytes from a-link2 (10.0.0.2): icmp_req=1 ttl=64 time=76.7 ms
64 bytes from a-link2 (10.0.0.2): icmp_req=2 ttl=64 time=76.5 ms
It may be surprising, but the ExoGENI node can route to nodes throughout our multi-hop DETER topology:
root@server-18393:~# ping c
PING c-link3 (10.0.1.2) 56(84) bytes of data.
64 bytes from c-link3 (10.0.1.2): icmp_req=1 ttl=63 time=153 ms
64 bytes from c-link3 (10.0.1.2): icmp_req=2 ttl=63 time=76.7 ms
The federated experiment in DETER runs ospf on each node, and fedd.py starts an ospf daemon on the ExoGENI node as well. The ExoGENI node simply discovers the routing table from that connection. We will show how to expolit this connection to interconnect more interesting topologoes.
Tearing The Experiment Down
To tear down the experiment, use the command:
users:~$ fedd_terminate.py --experiment_name $EXPNAME
This releases the DETER resources and disconnects the ExoGENI node. The ExoGENI slice remains intact and can be connected to another DETER experiment.
If an experimenter tears down the ExoGENI slice before the fedd_terminate.py command is issued, or there is some other problem, the --force flag can be given to make fedd_terminate.py purge all state that the federation system can reach.
A More Complex ExoGENI Topology
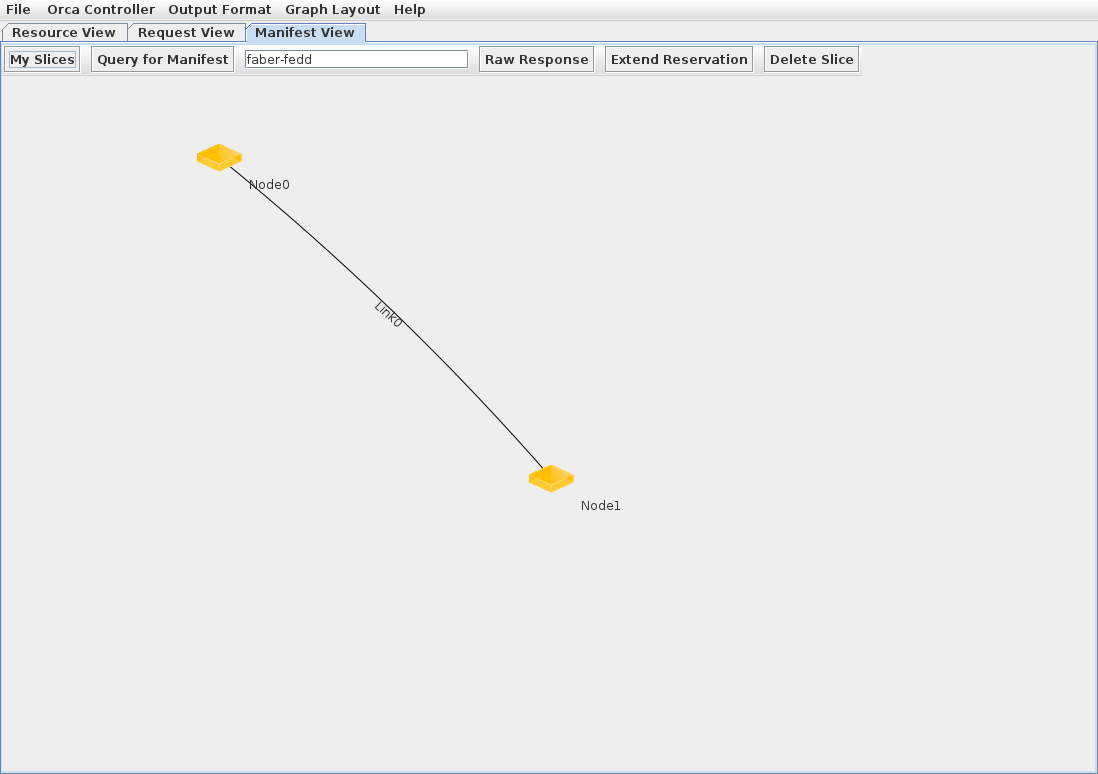
To connect a more complex ExoGENI topology, we look at routing from a two-node ExoGENI world into the same DETER topology. The ExoGENI topology looks like this:

Node0 is running the fedd and will be accessible as before at hostname "b". In addition we will make Node1 accessible throughout the DETER topology by its IP address.
When we create the ExoGENI topology we use the AutoIP feature of Flukes to assign addresses. By default Flukes puts the addresses on the 172.16.0.0/30 subnet. We move those addresses to the 10.16.0.0/24 subnet by editing the nodes' properties. DETER uses the 10.0.0.0/8 network block for experiment interfaces. It uses the 172.16.0.0/30 net for addressing containers management interfaces.
When the slice is ready, log in to Node0 and run the init_fedd utility as before. In addition, add the following lines to /usr/local/etc/fedd/desktop.config:
# Export Interfaces (interfaces to run OSPF on/export to DETER).
# Comma-separated list of interface names
export_interfaces: eth1

# Export Networks (networks to export to OSPF - these usually correspond
# to export_interfaces).  Comma separated
export_networks: 10.16.0.0/24
With those settings, fedd.py will export any routes discovered on eth1 and network 10.16.0.0/24 to the ospfd running in DETER.
The simplest way to export a complex ExoGENI topology is to just run ospfd inside the ExoGENI topology. With these settings, the combined experiment will be able to route throughout the experiment as soon as routing converges. For this simple topology to work, we log in to Noed1 in exoGENI and add a route to all the DETER nodes through Node0:
# ip route add 10.0.0.0/16 via 10.16.0.1
Start up fedd.py on Node0 as before and run the same fedd_create.py command on DETER.
In addition to being able to contact Node0 directly, nodes in the DETER experiment now see a route to the 10.16.0.0/24 network:
a:~$ ip route
default via 192.168.1.254 dev eth4
10.0.0.0/24 dev eth2  proto kernel  scope link  src 10.0.0.2
10.0.1.0/24 via 10.0.4.2 dev eth1  proto zebra  metric 20
10.0.2.0/24 via 10.0.4.2 dev eth1  proto zebra  metric 20
10.0.3.0/24 dev eth0  proto kernel  scope link  src 10.0.3.1
10.0.4.0/24 dev eth1  proto kernel  scope link  src 10.0.4.1
10.16.0.0/24 via 10.0.3.2 dev eth0  proto zebra  metric 20
192.168.0.0/22 dev eth4  proto kernel  scope link  src 192.168.1.188
192.168.252.0/22 via 192.168.1.254 dev eth4  proto zebra
That route reaches Node1:
a:~$ ping 10.16.0.2
PING 10.16.0.2 (10.16.0.2) 56(84) bytes of data.
64 bytes from 10.16.0.2: icmp_req=1 ttl=63 time=139 ms
64 bytes from 10.16.0.2: icmp_req=2 ttl=63 time=69.9 ms
64 bytes from 10.16.0.2: icmp_req=3 ttl=63 time=69.4 ms
While some attention needs to be paid to routing if routing protocols are not run in ExoGENI, this facility allows a wide range of connectivity between the testbeds.
Attachments (3)
-
desk.tcl (675 bytes) - added by 11 years ago.
Desktop federated topology
-
desk.png (7.9 KB) - added by 11 years ago.
Visualization of that topology
-
ExoGENI.png (24.6 KB) - added by 11 years ago.
Simple ExoGENI topology
Download all attachments as: .zip